Too long? Want the code?
https://github.com/JosChavz/WS-Form-Lite-Dashboard/
I’d like to emphasize that this DataKit for sharing their post in how to make a dashboard for WS Form submissions. Please note that this post is going to be identical to DataKit. I hope to make later tutorials with my own twist in the future. Their solution was a start to solve the problem I was facing: showing users their form submissions. This was a task at work but was eventually transformed to something else due to the task’s complex needs. Nevertheless, I wanted to share this solution for others who would face this problem. Please note that this is not an absolute answer and can be customized by your own needs.
In order for this code to work, please be sure to keep your form the same at all times. Any field changes to the form after existing submissions may cause this code to break.
After installing and activating WS Form Lite on your website, create a WS Form:
Not sure how WS Forms work? Read the docs! Note that Lite users are limited.
You can submit dummy submissions by doing the following:
I would highly encourage to create dummy submissions for other dummy accounts. You could create dummy admin accounts and make submissions with the instructions. Another way of testing is by creating dummy non-admin accounts and submitting with those. This will require you to paste your form on a new page, and using WS Form Shortcode.
Whichever local environment you decided to go with, open up your IDE and open the folder which contains all WordPress files and directories (wp-content, wp-admin, etc.). This will be helpful for your IDE to know which WordPress and other plugin functions are available.
ws-submissions in your wp-content/plugins directory.ws-submissions.php. This will be your entry point which means it requires a couple of information on the header.assets directory, and inside of that folder:wsf-dialog.js filewsf-styles.css file<?php
/**
* Plugin Name: WS Form Submissions
* Description: Display WS Form submissions on the front-end.
* Version: 1.0.0
* Author: your-name
* Author URI: your-url
*/
// Exit if accessed directly.
if (!defined('ABSPATH')) {
exit;
}
// Define plugin constants
define('WFS_FRONTEND_PATH', plugin_dir_path(__FILE__));
define('WFS_FRONTEND_URL', plugin_dir_url(__FILE__));Later in this guide, we will be utilizing dialog so we need to import JS, and CSS for styling.
/**
 * Register and enqueue assets
 *
 * @return void
 */
public function register_assets(): void {
    wp_enqueue_script('wfs-frontend-js', WFS_FRONTEND_URL . '/assets/wfs-dialog.js', ['jquery']);

    wp_register_style('wfs-frontend-css', WFS_FRONTEND_URL . '/assets/wfs-styles.css', [], '1.0', 'all');

    wp_enqueue_style('wfs-frontend-css');
}
add_action('wp_enqueue_scripts', 'register_assets');When it comes to fields for WS Form, they are identified by an ID as such: field_#, where the # is the number of the field, and it isn’t necessarily sequential… It is if done all at first, but after you delete, add, move, the fields begin to have a different position in the associative array.
/**
* Fetch WS Form fields and labels.
*
* @param int $form_id The ID of the form.
* @return array The form fields and their labels.
*/
function get_ws_form_fields( $form_id ) {
	// Load WS Form classes.
	if ( ! class_exists( 'WS_Form_Submit' ) ) {
		return array();
	}

	$ws_form_submit           = new WS_Form_Submit();
	$ws_form_submit->form_id  = $form_id;
	$submit_fields            = $ws_form_submit->db_get_submit_fields();

	$fields = array();
	if ( $submit_fields ) {
		foreach ( $submit_fields as $id => $field ) {
			$fields[ 'field_' . $id ] = $field['label'];
		}
	}

	return $fields;
}In DataKit’s guide, it was to show all submissions. This is perfect for any administrators who want to see all the submissions in one page. However, in the case that you want to show the user their own submissions, then some changes is required.
/**
* Fetch WS Form submissions.
*
* @param int $form_id The ID of the form.
* @return array The form submissions.
*/
function get_ws_form_submissions(int $form_id, $limit = 100, $current_user_id = 0 ) {
	// Load WS Form classes.
	if ( ! class_exists( 'WS_Form_Submit' ) ) {
		return array();
	}

	$ws_form_submit         = new WS_Form_Submit();
	$ws_form_submit->form_id = $form_id;

	// Retrieve the submissions.
	return $ws_form_submit->db_read_all(
		$ws_form_submit->get_search_join(),
		$ws_form_submit->get_where([
			[
				'field' => 'user_id',
				'operator' => '==',
				'value' => $current_user_id,
			]
		]),
		$ws_form_submit->get_search_group_by(),
		$ws_form_submit->get_search_order_by(),
		$limit, // Limit.
		0, // Offset.
		true, // Get meta.
		true, // Get expanded.
		false, // Bypass user capability check.
		false // Clear hidden fields.
	);
}The only change that I had to make was under the where clause.
$ws_form_submit->get_where([
		[
			'field' => 'user_id',
			'operator' => '==',
			'value' => $current_user_id,
		]
]),Earlier, it was defined that $ws_form_submit was constructed under WS_Form_Submit class which comes from wp-content/plugins/ws-form/includes/core/class-ws-form-submit.php so please feel free to scroll through that page. You might come across something you might need in your own version.
The reason behind a double array is because from reading the function, get_where, you can read the flexible accepted fields and operators that are accepted. So, if your customization is complex, please read into that function!
As for where I got the name for the field to search for, all submissions are stored in {wp}_wsf_submit. You can choose which field you want to filter out, and no need to worry about the form_id because that has already been established in line 14 from our get_ws_form_submissions function. Also don’t worry about setting the status of the submission, because the developers have already thought about that in their get_where function.
// If status has not been set, add default status WHERE SQL
if(!$status_set) { $where .= self::get_where_default_status(); }The first thing we will do is find out the shortcode attributes by using the shortcode_atts function. After getting two of the attributes, form_id and limit, we also want to get the user’s ID. If the user is logged out, the ID will be 0. Meaning that if it’s a 0, we do not proceed…
The next things to get are the fields and the submissions. Fields will exist if the Form ID exists, but the submissions can be empty for that user. So in that case, simply return a message that there are no submissions.
/**
* Display WS Form submissions on the front-end.
*
* @param array $atts Shortcode attributes.
* @return string The HTML output for the form submissions.
*/
function display_ws_form_submissions(array $atts ): string {
  $atts = shortcode_atts(
		array(
			'form_id' => 1,
			'limit'   => 100,
		),
		$atts,
		'ws_form_submissions'
	);

	$form_id          = intval( $atts['form_id'] );
	$limit            = intval( $atts['limit'] );
	$current_user_id  = get_current_user_id();

	if (!$current_user_id) {
		return '<p>Sorry, you are not logged in.</p>';
	}

	$fields       = get_ws_form_fields( $form_id );
	$submissions  = get_ws_form_submissions( $form_id, $limit, $current_user_id );

	if ( empty( $submissions ) ) {
		return '<p>No submissions found.</p>';
	}

	ob_start();
	echo "Table and rows go here...";
	return ob_get_clean();
}

add_shortcode( 'ws_form_submissions', 'display_ws_form_submissions' );Later in this guide, Line 33 will be replaced with the table that will display all the submissions, but first, we need to understand the components to build the table.
DataKit’s table was straightforward showing all data on a table from the shortcode, but due to having so many fields, it can get real ugly very quick. Instead, I had a table that opened a dialog with the right information. However, before getting into the code, let’s break it down.
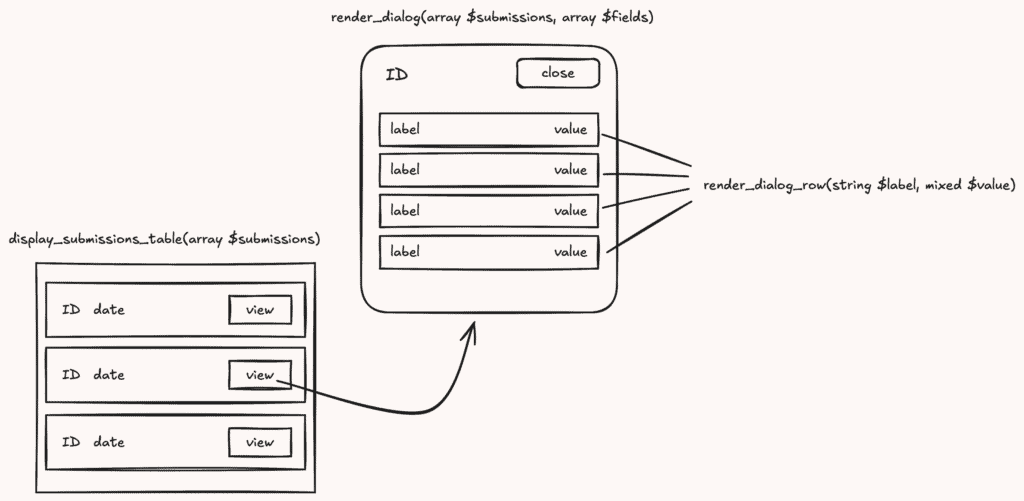
From the submissions array, we will extract each individual submission and only show their ID and date. You are open to var_dump the variable to see what other options you have. However, note that you won’t be able to access any of the submission’s field values.
/**
* Displays the submission table which contains the ID, Date, and a Button to open the
* dialog
*
* @param $submissions
* @return void
*/
function render_submissions_table($submissions): void {
		?>
		<table class="wfs-submissions-table">
			<thead class="wfs-header">
			<tr class="wfs-header-row">
				<th>ID</th>
				<th>Date</th>
				<th>Actions</th>
			</tr>
			</thead>
			<tbody class="wfs-body">
			<?php foreach ($submissions as $submission) : ?>
          <tr class="wfs-body-row">
              <td data-label="Name"><?php echo esc_html($submission->id); ?></td>
              <td data-label="Date"><?php echo esc_html($submission->date_added); ?></td>
              <td data-label="Actions">
                  <button id="submission_<?php echo esc_attr($submission->id); ?>-button" class="wfs-button">View</button>
              </td>
          </tr>
		<?php endforeach; ?>
        </tbody>
    </table>
    <?php
}Note: If you are experienced with WordPress programming, you will notice that the date’s name is
date_addedand notcreated_at. Remember that this is not apostbut rather a{wp}_wsf_submitand{wp}_wsf_submit_metajoined instance.
.wfs-submissions-table {
    width: 100%;
    border-collapse: separate;
    border-spacing: 0;
    margin: 24px 0;
    font-size: 16px;
    background-color: #fff;
    border-radius: 8px;
    box-shadow: 0 2px 10px rgba(0, 0, 0, 0.08);
    overflow: hidden;
}
.wfs-submissions-table thead.wfs-header {
    display: table-header-group;
    background-color: #f8fafc;
}
.wfs-submissions-table thead tr.wfs-header-row { display: table-row; }
.wfs-submissions-table th {
    padding: 16px;
    text-align: left;
    font-weight: 600;
    color: #334155;
    border-bottom: 2px solid #e2e8f0;
    text-transform: uppercase;
    font-size: 14px;
    letter-spacing: 0.5px;
}
.wfs-submissions-table tbody.wfs-body tr {
    display: table-row;
    transition: background-color 0.2s ease;
}
.wfs-submissions-table tbody.wfs-body tr:hover { background-color: #f1f5f9; }
.wfs-submissions-table tbody.wfs-body td {
    display: table-cell;
    padding: 16px;
    border-bottom: 1px solid #e2e8f0;
    color: #475569;
    vertical-align: middle;
}
.wfs-submissions-table tbody.wfs-body tr:last-child td { border-bottom: none; }
.wfs-submissions-table td:first-child {
    /* ID */
    font-weight: 600;
    color: #334155;
}
.wfs-submissions-table td:nth-child(2) { color: #64748b; /* Date */ }
button.wfs-button {
    background-color: #4f46e5;
    color: white;
    border: none;
    padding: 8px 16px;
    border-radius: 6px;
    font-weight: 500;
    cursor: pointer;
    transition: all 0.2s ease;
    font-size: 14px;
}
button.wfs-button:hover {
    background-color: #4338ca;
    transform: translateY(-1px);
    box-shadow: 0 2px 4px rgba(0, 0, 0, 0.1);
}
button.wfs-button:active {
    transform: translateY(0);
    box-shadow: none;
}
button.wfs-button:focus {
    outline: 2px solid #818cf8;
    outline-offset: 2px;
}The next thing to do is to display the dialogs. These will be hidden by default, but all submissions will have their own dialog. If a user has a bunch of submissions, more than 100, then there will be 100 hidden dialogs in the DOM, which may hurt the loading speed, potentially. Pagination is something that I have not really figured out. So please be cautious!
/**
 * Render submission dialogs
 *
 * @param array $submissions
 * @param array $fields
 * @return void
 **/
function render_dialogs(array $submissions, array $fields): void {
  foreach ($submissions as $submission) : ?>
    <dialog class="wfs-form-dialog" id="submission_<?php echo esc_attr($submission->id); ?>-dialog">
			<form method="dialog">
				<header>
					<h2><?php echo esc_html($submission->id); ?></h2>
					<button autofocus type="reset" onclick="this.closest('dialog').close('cancel')">Close</button>
				</header>
				<table id="wfs_dialog_table-<?php echo esc_attr($submission->id); ?>" class="wfs_form_table">
					<?php
							foreach ($fields as $field_id => $label) {
                $value = $submission->meta[$field_id]['value'];
                if (is_array($value)) {
                      echo "is array<br />";
                  } else {
                      echo $label . ' => ' . $value;
                  }
							}
					?>
				</table>
			</form>
		</dialog>
  <?php endforeach;
}Lines 20 – 25 is a temporary placeholder and will be replaced with our future render_dialog_row function.
Just for now, the styles will be based on the dialog, and not the table within. We will do that next.
/** Dialog Styling **/
:root {
    --tablet-modal-height: 80svh;
    --tablet-modal-width: 90%;

    --desktop-modal-height: 85svh;
    --desktop-modal-width: 80%;
}
.wfs-form-dialog::backdrop { background-color: rgba(0, 0, 0, 0.6); }
dialog.wfs-form-dialog {
    z-index: 20;
    width: var(--tablet-modal-width);
    height: var(--tablet-modal-height);
    margin-top: 25px;
    margin-bottom: 25px;
    overflow-y: scroll;
    overflow-x: hidden;
    border: none;
    border-radius: 8px;
    max-width: 90%;
    background-color: #fff;
}
dialog.wfs-form-dialog form { padding: 25px; }
dialog.wfs-form-dialog form h2 { margin: 0; }
dialog.wfs-form-dialog form header {
    display: flex;
    justify-content: space-between;
}
dialog.wfs-form-dialog form header button{
    background-color: #4f46e5;
    color: white;
    border: none;
    padding: 8px 16px;
    border-radius: 6px;
    font-weight: 500;
    cursor: pointer;
    transition: all 0.2s ease;
    font-size: 14px;
}
dialog.wfs-form-dialog form header button:hover {
    background-color: #4338ca;
    transform: translateY(-1px);
    box-shadow: 0 2px 4px rgba(0, 0, 0, 0.1);
}
dialog.wfs-form-dialog form header button:active {
    transform: translateY(0);
    box-shadow: none;
}
dialog.wfs-form-dialog form header button:focus {
    outline: 2px solid #818cf8;
    outline-offset: 2px;
}
@media only screen and (min-width: 768px) {
    /* Desktop styling */
    dialog.wfs-form-dialog {
        height: var(--desktop-modal-height);
        width: var(--desktop-modal-width);
    }
}Can’t forget about the JavaScript! Due to all the modals being hidden, the first thing to do is get all the buttons from the dashboard. Thanks to having an ID attribute with the submission ID, we could then extract that, append -dialog, and show the modal. Thanks to HTML native dialog, it’s easy to open the dialog just by calling showModal() on the element.
jQuery(document).ready(function($) {
    "use strict";

    // Get all the buttons for CM
    const wfs_buttons = $('.wfs-button');

    // Open Dialog
    wfs_buttons.on('click', function(e) {
        e.preventDefault();
        const id = $(this).attr('id');
        const dialogId = id.substring(0, id.lastIndexOf('-')) + '-dialog';
        const dialog = document.getElementById(dialogId);
        dialog.showModal();
        dialog.addEventListener('click', lightDismiss)
    });

    const lightDismiss = ({target:dialog}) => {
        if (dialog.nodeName === 'DIALOG')
            dialog.close('dismiss')
    }
})Instead of having the first row be labels, we will have the first column of each row contain the label and the second column to be the value. In the case that the value is an array, then we will join the array using a comma as a delimiter.
/**
 * Renders the row for the dialog using its passed label and value(s)
 * If the value is an array, the result will be a joined string with comma delimiter
 *
 * @param string $label
 * @param mixed $value
 * @return void
 */
function render_dialog_row(string $label, mixed $value) : void {
    ?>
    <tr style="display: table-row;">
        <th><?php echo esc_html($label) ?></th>
        <td style="padding: 12px 10px; display: table-cell;">
            <?php
                if ( !is_array($value) ) echo esc_html($value);
                else echo esc_html(implode(', ', $value));
            ?>
        </td>
    </tr>
    <?php
}Finally! We are at the very last part! Now we want to just add in all the logic that we have written.
We want to create a shortcode and allow for the WS Form ID and limit to be presented. Due to this shortcode only allowing user’s who are logged-in, we also need to include a conditional to kick logged-out users.
/**
* Display WS Form submissions on the front-end.
*
* @param array $atts Shortcode attributes.
* @return string The HTML output for the form submissions.
*/
function display_ws_form_submissions(array $atts ): string {
  // PRIOR CODE...

	ob_start();

	render_submissions_table($submissions);
	render_dialogs($submissions, $fields);

	return ob_get_clean();
}I’d like to emphasize the importance of when to use ob_start with this plugin. We are using it once in this function, so using it elsewhere such as render_submissions_table, render_dialogs, or any inner-functions might cause things to break. So, if you ever want to expand on this plugin, only echo if you are in PHP or write the HTML code outside of PHP block, similar to the render_dialog_row definition.
Now that we are done, use the shortcode in any pages that you wish. If you are using a block-editor, make sure to use the Shortcode block, such as:
[ws_form_submissions form_id="2"]Enjoy!